Nahttypen Explained: The Ultimate Guide to Every Seam Type in Sewing
Meta Description: Everything you need to know about Nahttypen – from the basic straight seam to the French seam. Discover the most important seam types and choose the right technique for your fabric and project. (155 characters)
By a Sewing & Textile Expert | May 2026 | 10 min read
Tags: Sewing, Textiles, DIY, Tailoring, Tutorials
Whether you're just picking up a needle and thread for the first time or you've spent years working at a sewing machine, one thing remains constant: choosing the right Nahttyp (seam type) determines the durability, appearance, and function of everything you make. Nahttypen are the foundation of all sewing and tailoring — they connect fabric layers, give garments their shape, and decide whether your project survives the rigors of daily use or falls apart at the first wash.
In this guide, you'll learn everything about the most important Nahttypen — from the classic straight seam to professional techniques like the French seam, flat seam, and lapped seam. You'll understand when to use each seam type, which fabrics pair best with which technique, and the most common mistakes to avoid.
What Are Nahttypen? The Basics at a Glance
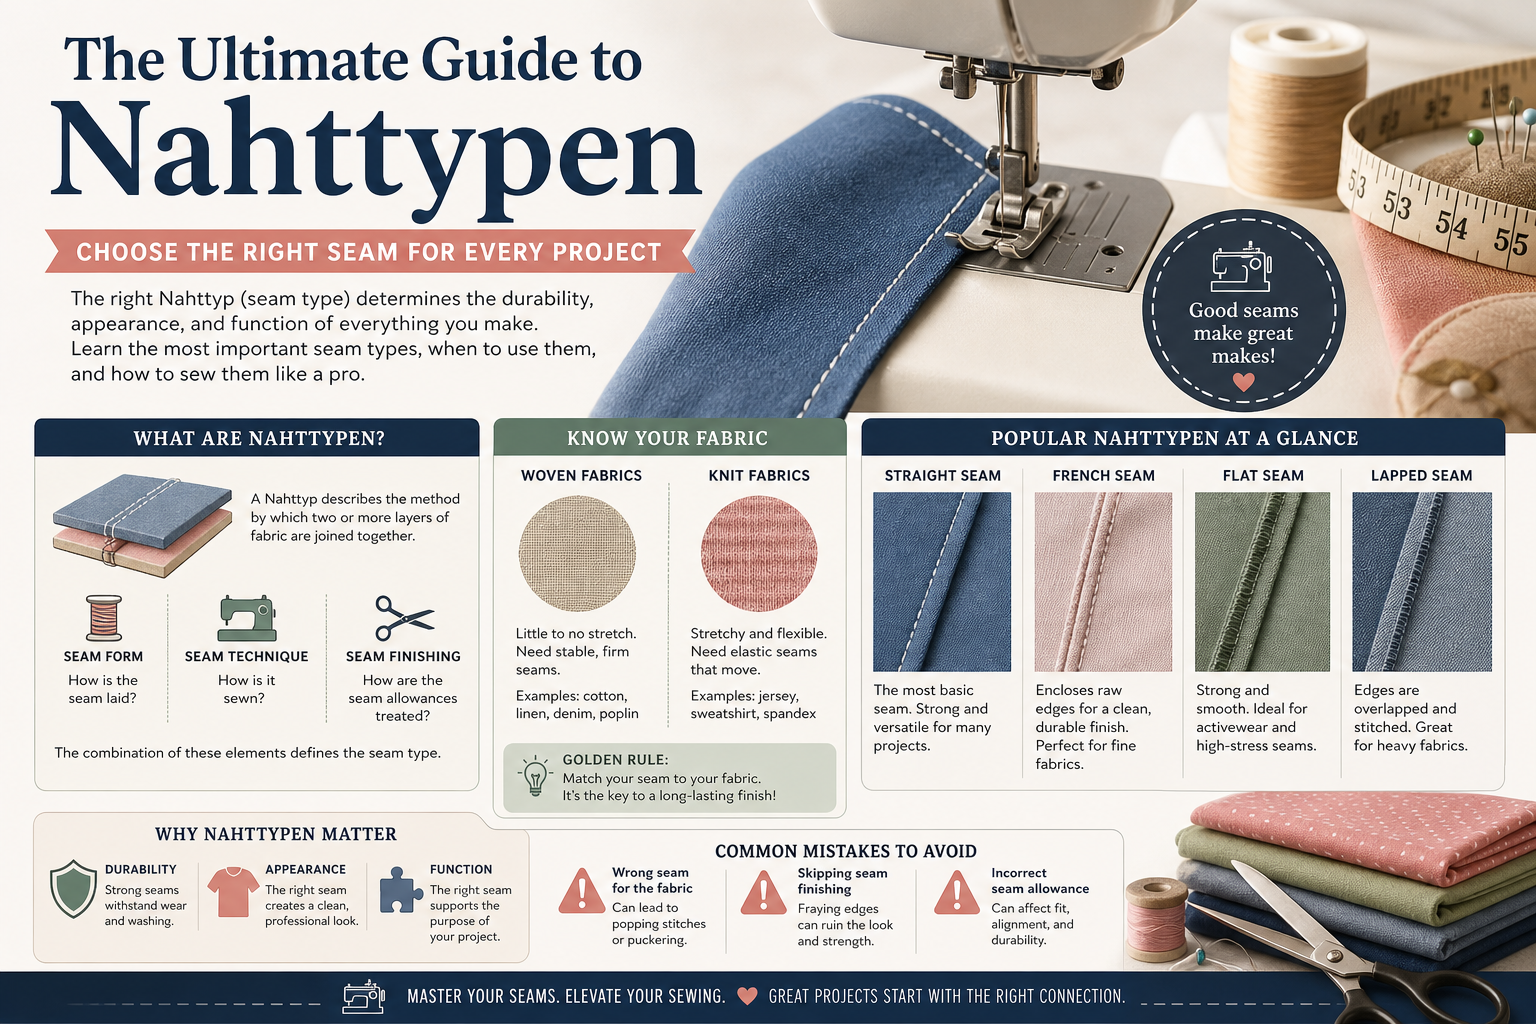
A Nahttyp describes the method by which two or more layers of fabric are joined together. There are three dimensions to consider: the seam form (how is the seam laid?), the seam technique (how is it sewn?), and the seam finishing (how are the seam allowances treated?). The combination of these elements defines the seam type.
In tailoring and home sewing, a key distinction exists between seams for woven fabrics and those for knit fabrics. Woven materials have little natural stretch and require stable, firm seams. Knit fabrics, on the other hand, need elastic seam types that move and stretch with the material — a straight stitch on jersey will simply snap.
Understanding which category your fabric falls into is the single most important first step before you even thread your machine.
Why Nahttypen matter:
- Durability — The right seam holds garments together through years of wear and washing.
- Appearance — Some seam types are visible and define the visual character of a piece.
- Function — Certain seams enable stretch; others create flat, pressure-free connections.
- Material compatibility — Fabric weight, weave, and fiber type all influence which seam works best.
The Most Important Nahttypen — A Complete Overview
There are dozens of named seam types, but a core group forms the foundation of almost every sewing project. Here are the essential Nahttypen that every sewist should have in their toolkit:
1. The Straight Seam (Plain Seam)
The straight seam is the most common of all Nahttypen. Two fabric layers are placed right sides together and joined with a straight line of stitching. The standard seam allowance is 5/8 inch (1.5 cm). This seam type works with virtually all woven fabrics and is the ideal starting point for beginners.
- Applications: Side seams, shoulder seams, general fabric joins
- Best fabrics: Cotton, linen, silk, polyester, wool
- Pro tip: Always backstitch at the beginning and end to lock the seam in place
2. The French Seam (Double Seam)
The French seam is one of the most elegant of all Nahttypen. In this technique, the raw seam allowances are completely enclosed within the seam itself — no raw edges are visible on either the outside or the inside of the garment. This makes it ideal for transparent fabrics like chiffon, organza, and lightweight silk.
The process works in two stages: first, the fabric is placed wrong sides together and sewn with a narrow seam, then turned so the right sides face each other and sewn again at the final seam allowance. The result is a clean, professional finish that speaks of quality craftsmanship.
"The French seam is proof that a well-made seam can be just as beautiful on the inside as it is on the outside."
3. The Overlock Seam
The overlock seam simultaneously trims, finishes, and joins fabric edges in a single pass. An overlock machine (also called a serger) cuts away excess fabric while wrapping the cut edge in a looped thread structure. This seam type is essential for knit fabrics and jersey, as it naturally stretches with the material.
- Advantages: Fast, elastic, professional-looking
- Applications: T-shirts, sweatshirts, activewear, underwear
- Note: Requires a dedicated overlock machine — but many home sewists consider it a worthwhile investment
4. The Flat Seam (Flatlock Seam)
The flat seam lies — as its name suggests — completely flat against the fabric. Both seam allowances are folded to the same side and topstitched down. This seam type is particularly comfortable in activewear and underwear, as it creates no ridge or pressure point against the skin.
High-performance sportswear brands rely heavily on flat seams. If you've ever worn a well-made pair of cycling shorts or a compression top, you've experienced the comfort of this Nahttyp firsthand.
5. The Lapped Seam (Felled Seam / Kappnaht)
The lapped seam (known in German as the Kappnaht) is celebrated for its exceptional strength and is the defining construction feature of denim jeans and workwear. One seam allowance is folded over the other and double-topstitched, creating a highly durable, flat join with a characteristic stitched appearance on the outside.
The golden seam lines running down the inseam and outseam of your jeans? That's a lapped seam — one of the most enduring and recognizable Nahttypen in fashion history.
6. The Blind Hem Seam
The blind hem seam creates an almost invisible finish on hems and interior edges. A special foot on your sewing machine guides the fabric so the needle catches only a single thread of the top layer, leaving no visible stitch on the right side. It's the go-to Nahttyp for dress trousers, skirts, curtains, and tailored garments where a clean finish is essential.
Nahttypen by Application — Choosing the Right Seam
Selecting the correct Nahttyp depends on three factors: the fabric, the intended use, and the desired aesthetic outcome. Use this reference table to find the best match quickly:
| Nahttyp | Best Fabrics | Application | Difficulty |
|---|---|---|---|
| Straight Seam | All woven fabrics | General joining | Beginner |
| French Seam | Sheer, lightweight fabrics | Blouses, lingerie | Intermediate |
| Overlock Seam | Jersey, knit, stretch | T-shirts, activewear | Intermediate |
| Flat Seam | Elastic fabrics | Underwear, sportswear | Advanced |
| Lapped Seam | Denim, canvas, twill | Jeans, workwear | Advanced |
| Blind Hem Seam | All fabrics | Hems, trousers, curtains | Intermediate |
| Welt Seam | Medium to heavy fabrics | Coats, bags, upholstery | Advanced |
Nahttypen for Stretch Fabrics — What Elastic Seams Must Do
Stretch fabrics like jersey, interlock, and viscose knit place special demands on your choice of Nahttyp. A standard straight stitch will snap under tension — so for knit materials, you need techniques that move and recover with the fabric.
Most modern sewing machines offer built-in stretch stitches designed precisely for this purpose:
- Zigzag stitch — the simplest elastic option, built into every basic machine
- Triple zigzag stitch — more robust, excellent for swimwear and performance fabrics
- Lightning stitch (stretch stitch) — highly elastic and strong simultaneously
- Overlock stitch (via serger) — the professional standard for all knit garments
- Coverstitch — the industry standard for professional jersey hems
The choice between these Nahttypen depends on the amount of stretch required, the weight of the fabric, and the finish you want on the inside of the garment.
Common Mistakes with Nahttypen — and How to Avoid Them
Even experienced sewists occasionally reach for the wrong Nahttyp or execute a seam poorly. Here are the most frequent issues — and their solutions:
- Wrong seam allowance: Too narrow and the seam will fray; too wide wastes material and adds bulk. The standard 5/8 inch (1.5 cm) works for most Nahttypen.
- Skipping the backstitch: Without a locking stitch at start and end, the seam will unravel with use. This is the number one beginner error.
- Using a straight seam on knit fabric: A straight stitch on jersey will snap the first time the garment is stretched. Always use an elastic stitch for stretch fabrics.
- Inconsistent seam allowance: Wandering away from the seam guide creates uneven joins that are difficult to correct. Use the guide marks on your machine as a visual anchor.
- Skipping pressing: Pressing each seam open or to one side after sewing is not optional — it's what transforms a home-sewn item into something that looks professionally made.
Remember: the best Nahttyp in the world won't save a sloppily sewn seam. Slow, careful work always outperforms fast, careless stitching.
Nahttypen in Professional Fashion and Industry
In haute couture and industrial textile production, seam types are classified according to international standards. ISO 4916 and DIN 61 400 define which Nahttypen are approved for specific applications. In the industry, seam classes are used to specify construction precisely:
- Class 1 — Superimposed seams: Layers stacked on top of each other and sewn; the most common basic form
- Class 2 — Lapped seams: Overlapping seams used for denim and heavy-duty textiles
- Class 3 — Bound seams: Edges enclosed with binding tape, often bias binding
- Class 4 — Flat seams: Used extensively in the underwear and sportswear industry
Understanding these classifications is invaluable for anyone working with commercial sewing patterns, technical flat drawings, or production specifications. It bridges the gap between home sewing and the professional world.
Internal Linking Suggestions
To strengthen your site's topical authority around Nahttypen, consider linking this article to:
- "How to calculate seam allowances — a beginner's guide"
- "Overlock vs. sewing machine: what do you really need?"
- "How to choose fabric for your sewing project"
- "Backstitching and locking stitches: sewing like a professional"
- "The complete guide to pressing seams open vs. to the side"
External Authority References
- ISO 4916 — International standard for seam classification in textile production
- DIN 61 400 — German standard for sewing seam types
- Threads Magazine (Taunton Press) — Leading authority on garment construction techniques
- ASTM D6193 — Standard practice for stitches and seams (American standard)
FAQ: Frequently Asked Questions About Nahttypen
Which Nahttyp is easiest for beginners?
The plain straight seam is the best entry point. It requires only a basic sewing machine, a consistent seam allowance of 5/8 inch (1.5 cm), and a backstitching habit at both ends. With this single Nahttyp mastered, you can already complete a remarkable variety of projects: pillowcases, tote bags, simple skirts, and more.
Which Nahttyp do I need for jersey and knit fabric?
For elastic fabrics like jersey or interlock, you need an elastic Nahttyp. The simplest option available on every basic machine is the zigzag stitch. For more professional results, a serger (overlock machine) is the gold standard. For hems on jersey garments, a coverstitch machine creates the double-needle finish you see on store-bought T-shirts. Never use a straight seam on knit — it will break under the first stretch.
What is the difference between a Nahttyp and a sewing technique?
A Nahttyp (seam type) describes the construction of the seam — how fabric layers are arranged and joined. A Nähtechnik (sewing technique) describes the process: which stitch is used, what thread weight is appropriate, and how the machine is set up. In practice, the two concepts are closely linked — every seam type implies a specific sewing technique to execute it correctly.
When should I use a lapped seam (Kappnaht)?
The lapped seam is ideal for heavy, durable materials like denim, canvas, sailcloth, and waxed cotton. Its double-topstitched construction makes it exceptionally resistant to stress and wear, which is why it's the defining seam of jeans, workwear jackets, rucksacks, and outdoor gear. It is more time-consuming to sew than a plain seam but vastly stronger in applications where seam integrity matters.
Can I sew a French seam on a regular sewing machine?
Absolutely. The French seam requires no special equipment — just a standard machine with a straight stitch. You sew in two passes: first with wrong sides together at a narrow seam allowance (about 3/8 inch / 1 cm), then press, trim, and fold so right sides face each other before sewing the final seam at the full allowance. The raw edges are now completely hidden inside the seam. It takes practice, but it's one of the most satisfying Nahttypen to master.
Conclusion: Master Your Nahttypen, Master Your Craft
Understanding and choosing the right Nahttypen is one of the most fundamental and rewarding skills in all of sewing and tailoring. Whether you're constructing casual everyday garments or precision-crafted professional pieces, the seam type you choose makes the difference between something that lasts a lifetime and something that comes apart at the seams — literally.
Start with the foundations: master the straight seam, move on to the overlock seam for stretch fabrics, and work your way toward the refined elegance of the French seam. With every project, your understanding of fabric, technique, and Nahttypen will deepen — and with it, your confidence and precision at the machine.
Every expert sewist was once a beginner who struggled with crooked seams and missed backstitches. The difference is that they kept going, kept learning, and kept sewing.
Ready to take your sewing to the next level?
Explore our step-by-step tutorials for each Nahttyp — with detailed instructions, technique breakdowns, and expert tips drawn directly from professional tailoring practice.
Related reading: How to Choose the Right Sewing Thread · Pressing Techniques for Professional Results · Understanding Fabric Grain Lines